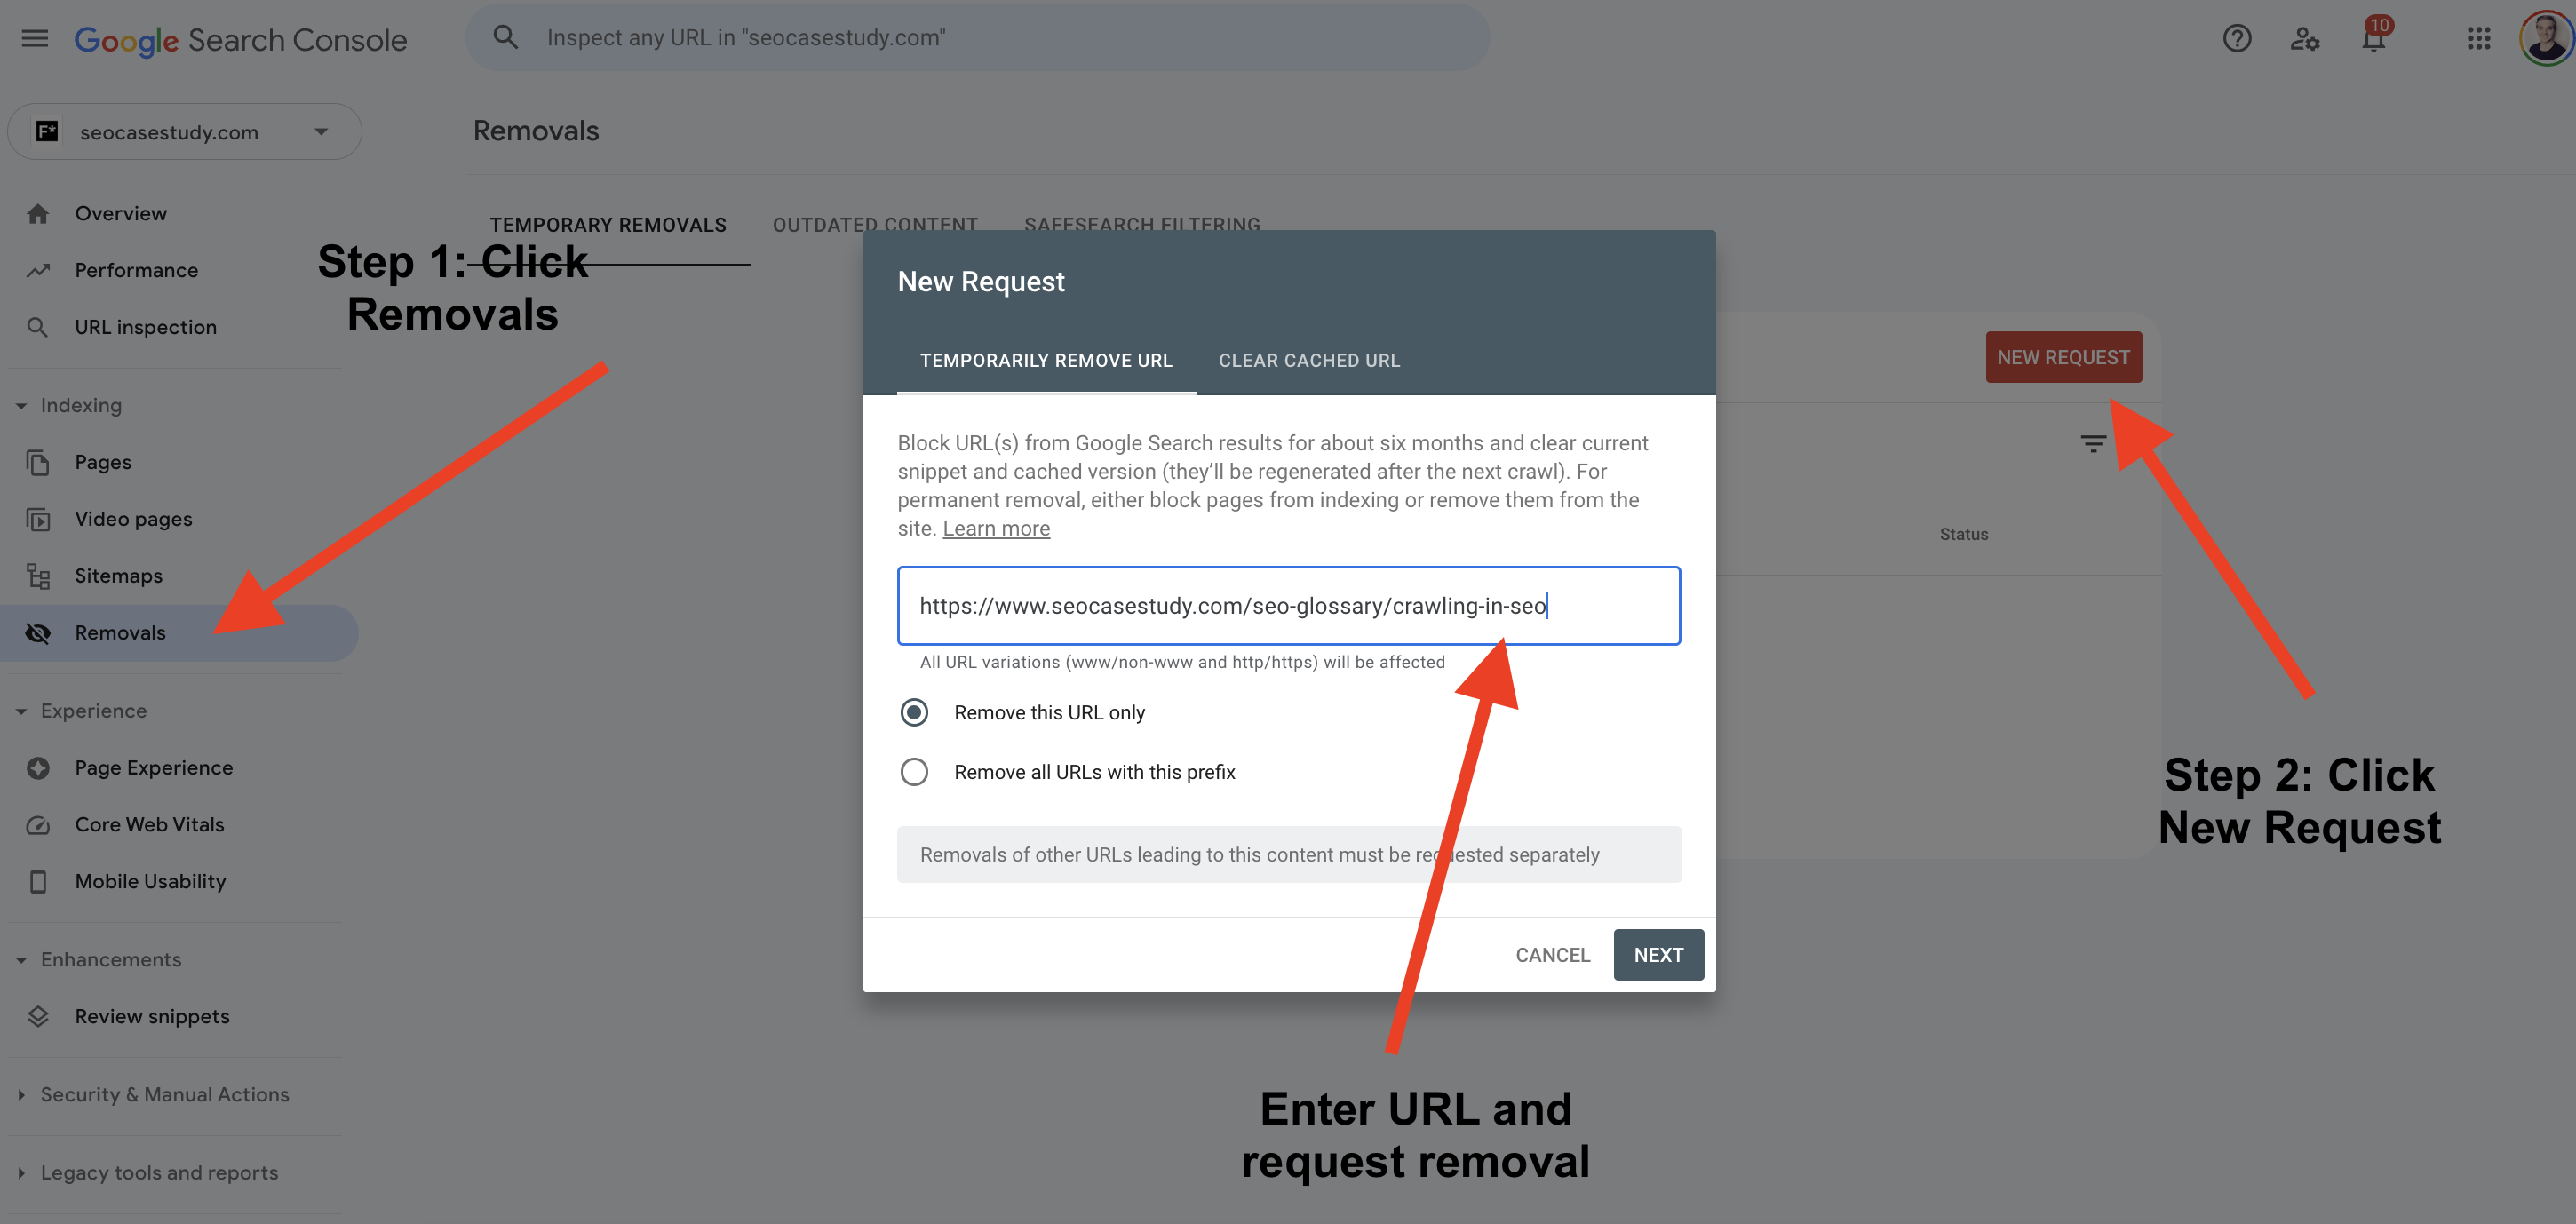
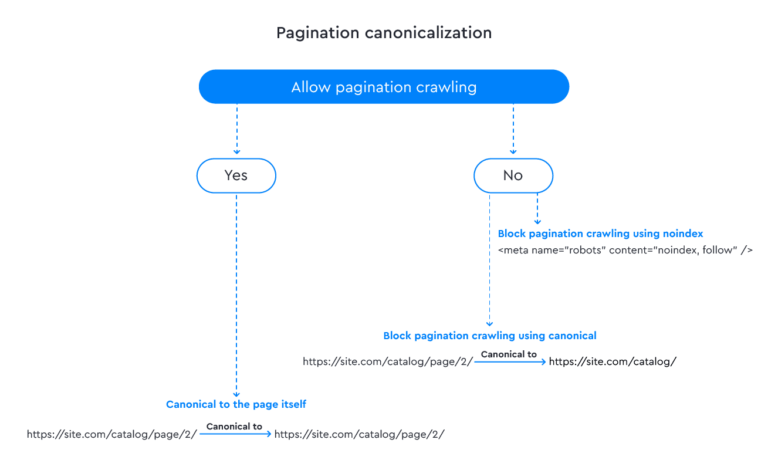
To de-index pages from Google search results, use the Google Search Console’s URL removal tool. Ensure you have ownership verification for the site.
Removing a page from Google’s index is a critical step for many website owners and SEO professionals. This process can be necessary for several reasons, such as outdated content, sensitive information, or part of a larger site cleanup to maintain SEO health.
Google provides tools to manage what appears in its search results, with the Google Search Console being the primary method for requesting the removal of a page. Understanding how to effectively use this tool is crucial for anyone looking to manage their online presence. It’s not just about removing content; it’s about controlling how your website interacts with the largest search engine in the world. Properly de-indexing a page can help ensure that your site’s content remains relevant, secure, and in line with your SEO strategy.

Introduction To De-index Pages
Removing a page from Google can be crucial. It protects your site’s integrity and maintains the quality of your content. Sometimes, pages go outdated or show sensitive information. In such cases, de-indexing is necessary. This process excludes pages from search results effectively.
Why Remove A Page From Google
- Outdated Content: Prevents users from seeing old, irrelevant information.
- Sensitive Data: Removes personal or confidential information fast.
- Duplicate Content: Avoids penalties for having the same content on multiple pages.
Impact On Seo And Traffic
De-indexing a page can lead to a drop in traffic if not managed well. Yet, it can improve the overall SEO of your site by eliminating low-quality pages. This ensures that only the best content represents your site on Google.
Identifying Pages For Removal
Before removing a page from Google, we must identify which pages need removal. This step is crucial for maintaining a healthy website. Let’s explore how to spot these pages effectively.
Criteria For De-indexing
Not all pages should stay on Google. Some need removal. Here are key reasons:
- Duplicate content can confuse Google and users.
- Outdated information misleads and reduces trust.
- Private data should stay off public search results.
- Low-quality pages don’t help users or your site.
Tools To Spot Indexation Issues
Several tools can help find what pages Google has indexed:
- Google Search Console: Shows indexed pages and issues.
- Screaming Frog: Crawls your site, identifying SEO problems.
- Ahrefs: Provides detailed reports on your site’s index status.
Use these tools to find pages that don’t meet our criteria. Then, prepare them for removal from Google’s search results.
Using The Google Search Console
Using the Google Search Console is a powerful way to manage your site’s visibility on Google. If you need to remove a page from search results, this tool is your go-to solution. Let’s dive into the process with these easy-to-follow steps.
Setting Up Your Account
First, you need a Google Search Console account. Follow these steps:
- Go to Google Search Console.
- Click on ‘Start now’.
- Sign in with your Google account.
- Add your website under ‘Property’.
- Verify ownership through the recommended method.
Navigating The Removals Tool
After setting up your account, use the Removals Tool:
- Log in to Google Search Console.
- Select your website property.
- Click on ‘Removals’ in the left-hand menu.
- Choose the ‘New Request’ button.
- Enter the URL of the page you want to remove.
- Submit your request.
Google will review and process your request. The page will be temporarily removed for about six months. For permanent removal, delete the page or use a noindex tag.
Robots.txt File Method
The Robots.txt File Method is a powerful tool for website managers. This method tells search engines which pages not to crawl. By using the robots.txt file, you can remove unwanted pages from Google search results effectively.
Crafting The Correct Disallow Directive
To de-index a page, the robots.txt file must have the correct syntax. A simple directive can prevent search engines from indexing a page:
Disallow: /example-page/
Ensure the path is correct and points to the page you want to de-index. The forward slash after the page name is crucial for precise matching.
Common Mistakes To Avoid
- Forgetting the forward slash: Without it, the directive may not work.
- Using wildcards improperly: Wildcards like
can lead to de-indexing multiple pages. - Blocking the wrong content: Double-check the paths to avoid hiding important pages.
- Ignoring case sensitivity: URLs are case-sensitive, so match the directive exactly.
Remember, changes to the robots.txt file take time. Google must recrawl the site to update its index.
Meta Tags And Headers
Meta Tags and Headers play a crucial role in SEO. They tell search engines about the content of a page. Sometimes, you may need to hide a page from Google. This ensures it doesn’t appear in search results. Let’s dive into how to do this effectively using meta tags and headers.
Implementing Noindex Tags
Using Noindex tags is a straightforward way to de-index a page. These tags instruct search engines not to show the page in search results. Here’s how to implement them:
- Open the HTML file of your page.
- Add the following line in the section:
- Save changes and upload the updated file to your server.
This tag effectively tells search engines to ignore the page. It’s a simple yet powerful tool for website management.
Verifying Header Responses
After implementing Noindex tags, verifying header responses is crucial. This ensures the tags work correctly. Follow these steps:
- Use a tool like Google’s Inspect URL feature in Search Console.
- Enter the URL of the noindexed page.
- Look for a ‘noindex’ tag in the HTTP header response.
Seeing the ‘noindex’ tag in the response confirms its proper implementation. This step is key to ensuring your page stays hidden from search results.
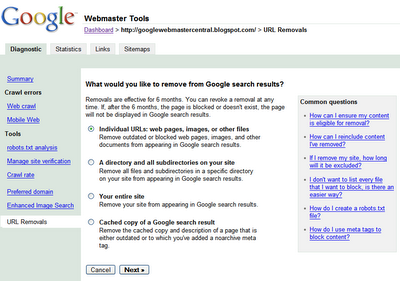
Credit: developers.google.com
Temporary Vs. Permanent Removal
Mastering the control of your online content is crucial.
Specific pages may need removal from Google’s search index.
The choice between temporary and permanent removal affects your site’s visibility.
Choosing The Right Method
Two main paths exist: temporary and permanent.
Temporary removal hides content for a short period.
Permanent deletion erases a page from search results indefinitely.
Use Google Search Console for both methods.
Consequences Of Each Approach
Temporary removal is ideal for content updates.
It gives a six-month window before the content reappears.
Permanent removal needs a 404/410 status code.
It tells Google the page is gone for good.
Think carefully before choosing.
Each choice affects your site’s SEO and user experience.
| Action | Time Frame | SEO Impact |
|---|---|---|
| Temporary Hide | 6 months | Minimal |
| Permanent Delete | Forever | Significant |
Troubleshooting Common Issues
Troubleshooting Common Issues can be frustrating when removing pages from Google search results. You might face hurdles like pages still showing up or wrong pages getting de-indexed. This guide helps you fix these problems effectively.
Page Still Appears In Search Results
Seeing a page in search results after requesting de-indexing is common. Use the steps below to resolve this:
- Check if the de-index request was successful in Google Search Console.
- Verify that the page is not cached in Google’s search results.
- Ensure the
noindextag is properly placed in the page’s HTML. - Wait for Google to process the changes. It may take a few days.
Incorrectly De-indexed Pages
Prevent and fix accidental de-indexing with these tips:
- Review your
noindextags to ensure only the intended pages have them. - Check your
robots.txtfile. It shouldn’t block pages you want indexed. - Use Google Search Console to request re-indexing of the correct pages.
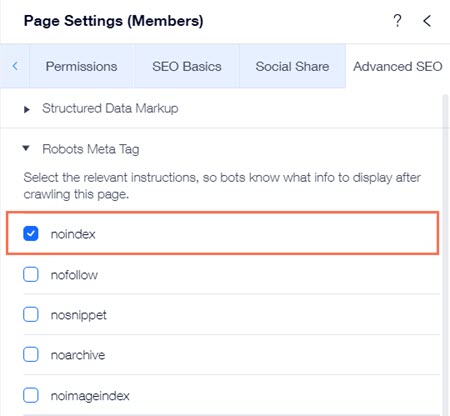
Credit: support.wix.com
Re-indexing A Page After Removal
Webmasters might need to de-index a page and later re-index it. This process is crucial for maintaining a site’s relevance and accuracy in Google search results. Below are steps to guide you through re-indexing a page after removal.
Steps To Re-index
Re-indexing a page involves several steps:
- Check page readiness: Ensure the page content is updated and error-free.
- Access Google Search Console: Use your Google Search Console account.
- Submit URL to Google: Enter the URL of the page you wish to re-index.
- Request indexing: Click on the ‘Request Indexing’ button.
After these steps, Google will process the re-indexing request. The time it takes may vary.
Monitoring Reappearance In Serps
Once you request re-indexing, monitor the page’s return in search results:
- Use Search Console: Track the status of your indexing request.
- Perform regular searches: Look for your page in Google search results.
- Check for crawl errors: Ensure no issues are blocking Google’s crawlers.
Regular monitoring helps you confirm the page’s visibility to users.
Best Practices And Precautions
Understanding the ‘Best Practices and Precautions’ is key to de-indexing pages. It ensures search engines remove content effectively. Follow these steps to maintain your site’s integrity.
Regularly Review Indexed Pages
It’s essential to monitor which pages Google indexes. Use tools like Google Search Console for this task. Check for outdated or irrelevant content. Remove these pages promptly. Regular audits prevent unwanted pages from ranking.
Maintaining Site Health Post-de-indexing
After de-indexing, keep your site healthy. Fix broken links. Update content. Ensure fast loading speeds. Use a sitemap to guide search engines. Monitor performance with analytics. Adjust strategies based on data.
Here are steps to de-index a page:
- Access Google Search Console.
- Select ‘Removals’ in the menu.
- Click ‘New Request’.
- Type the URL you wish to remove.
- Submit your request.
Remember these points:
- Robots.txt blocks new crawls, not existing indexes.
- Noindex tags must be on the page before removal requests.
- Temporary removal lasts about six months.
- Persistent removal requires a noindex tag or page deletion.
Follow these practices for the best results:
| Action | Reason |
|---|---|
| Monitor Index Status | Ensures only relevant pages appear in search results. |
| Update Content | Keeps your site fresh and relevant. |
| Fix Broken Links | Improves user experience and site health. |
Keep your site clean and relevant. Stay proactive with de-indexing. This maintains your site’s search presence. It also aligns with user expectations and Google’s guidelines.
Credit: backlinko.com
Frequently Asked Questions
Can I Remove A Url From Google?
Yes, you can request the removal of a URL from Google’s search results using the Google Search Console’s “Remove URLs” tool. This process is temporary and lasts about six months.
How Long Does De-indexing Take?
De-indexing a page can take a few days to a few weeks. Google must recrawl the page to register the de-indexing request before the page is removed from search results.
Does De-indexing Affect Site Ranking?
De-indexing a single page typically doesn’t affect the overall site ranking. However, if multiple pages are de-indexed, it could have a more significant impact.
What Is The Proper Way To De-index A Page?
The proper way to de-index a page is to either use a ‘noindex’ meta tag on the page or to remove the page and submit a removal request via Google Search Console.
Conclusion
Removing a page from Google’s search results doesn’t have to be daunting. With the steps outlined, you can confidently manage your site’s visibility. Remember, prompt action and regular monitoring ensure your content aligns with your online strategy. Keep these tips handy for a well-curated web presence.

